Ever wondered if you could turn a small, affordable device into a powerful firewall router? Well, buckle up because Raspberry Pi is here to save the day. In this guide, we’ll walk you through setting up Raspberry Pi as your very own firewall router. Trust me, it’s easier than you think.
When it comes to cybersecurity, having a solid firewall router setup is like having a superhero guarding your network. And what better way to achieve that than using a Raspberry Pi? This little device packs a punch and can be customized to fit your unique networking needs. Whether you're a tech enthusiast or just someone looking to enhance their home network security, this guide will have you covered.
Now, let’s dive into why Raspberry Pi is the ultimate choice for setting up a firewall router. Not only is it cost-effective, but it also allows you to experiment and tweak settings to your heart’s content. Plus, with the growing number of cyber threats out there, having a robust firewall setup is no longer a luxury—it’s a necessity.
Read also:Kayla Simmons Onlyfans Content The Story Behind The Leaked Drama
Why Use Raspberry Pi as a Firewall Router?
Before we jump into the nitty-gritty details, let’s talk about why Raspberry Pi is such a great option for a firewall router setup. Here are some key reasons:
- Affordable: Raspberry Pi is super budget-friendly compared to commercial firewall solutions.
- Versatile: You can customize it to suit your specific needs and preferences.
- Low Power Consumption: It uses minimal energy, making it an eco-friendly choice.
- Community Support: There’s a vast community of users ready to help with troubleshooting and tips.
With all these advantages, it’s no wonder Raspberry Pi has become a go-to option for hobbyists and professionals alike. So, if you’re ready to take your network security to the next level, let’s get started.
Understanding the Basics of Raspberry Pi
Before diving into the setup process, it’s essential to understand the basics of Raspberry Pi. This section will cover what Raspberry Pi is, its different models, and why it’s perfect for a firewall router setup.
What is Raspberry Pi?
Raspberry Pi is a small, single-board computer that was originally designed for educational purposes. Over time, it has evolved into a versatile tool used for a wide range of applications, from home automation to network security. Its compact size and affordability make it an ideal choice for DIY projects like setting up a firewall router.
Choosing the Right Model
Not all Raspberry Pi models are created equal. When it comes to setting up a firewall router, you’ll want to choose a model that can handle the processing power required for such tasks. Here are a few models to consider:
- Raspberry Pi 4 Model B: Offers the best performance with up to 8GB of RAM.
- Raspberry Pi 3 Model B+: A solid choice if you’re on a budget but still want decent performance.
- Raspberry Pi Zero W: Great for lightweight tasks, but might struggle with heavy network traffic.
Remember, the model you choose will depend on your specific needs and budget. For a firewall router setup, the Raspberry Pi 4 is generally recommended due to its superior processing power and networking capabilities.
Read also:Cierra Mistt Onlyfans Leaked The Inside Scoop You Need To Know
Setting Up Your Raspberry Pi for Firewall Router
Now that you understand the basics, it’s time to set up your Raspberry Pi as a firewall router. This section will guide you through the entire process step-by-step.
What You’ll Need
Before you begin, make sure you have all the necessary hardware and software:
- Raspberry Pi (preferably Model 4)
- MicroSD card with Raspberry Pi OS installed
- Power supply
- Ethernet cables
- Keyboard and monitor (optional)
Having all these components ready will make the setup process smoother and more efficient.
Installing Raspberry Pi OS
The first step is to install Raspberry Pi OS on your microSD card. Here’s how you can do it:
- Download the Raspberry Pi Imager from the official Raspberry Pi website.
- Insert your microSD card into your computer.
- Launch the Raspberry Pi Imager and select the Raspberry Pi OS you want to install.
- Choose your microSD card and click "Write" to install the OS.
Once the installation is complete, your Raspberry Pi is ready to boot up.
Configuring Raspberry Pi for Network Security
With your Raspberry Pi up and running, it’s time to configure it for network security. This involves setting up a firewall, configuring the network, and installing necessary software.
Setting Up a Firewall
A firewall is crucial for protecting your network from unauthorized access. Here’s how you can set one up on your Raspberry Pi:
- Install the UFW (Uncomplicated Firewall) package using the command: sudo apt install ufw
- Enable the firewall with: sudo ufw enable
- Set default rules to deny incoming and allow outgoing traffic: sudo ufw default deny incoming and sudo ufw default allow outgoing
- Allow specific ports as needed, for example: sudo ufw allow ssh
By setting up a firewall, you’re adding an extra layer of protection to your network.
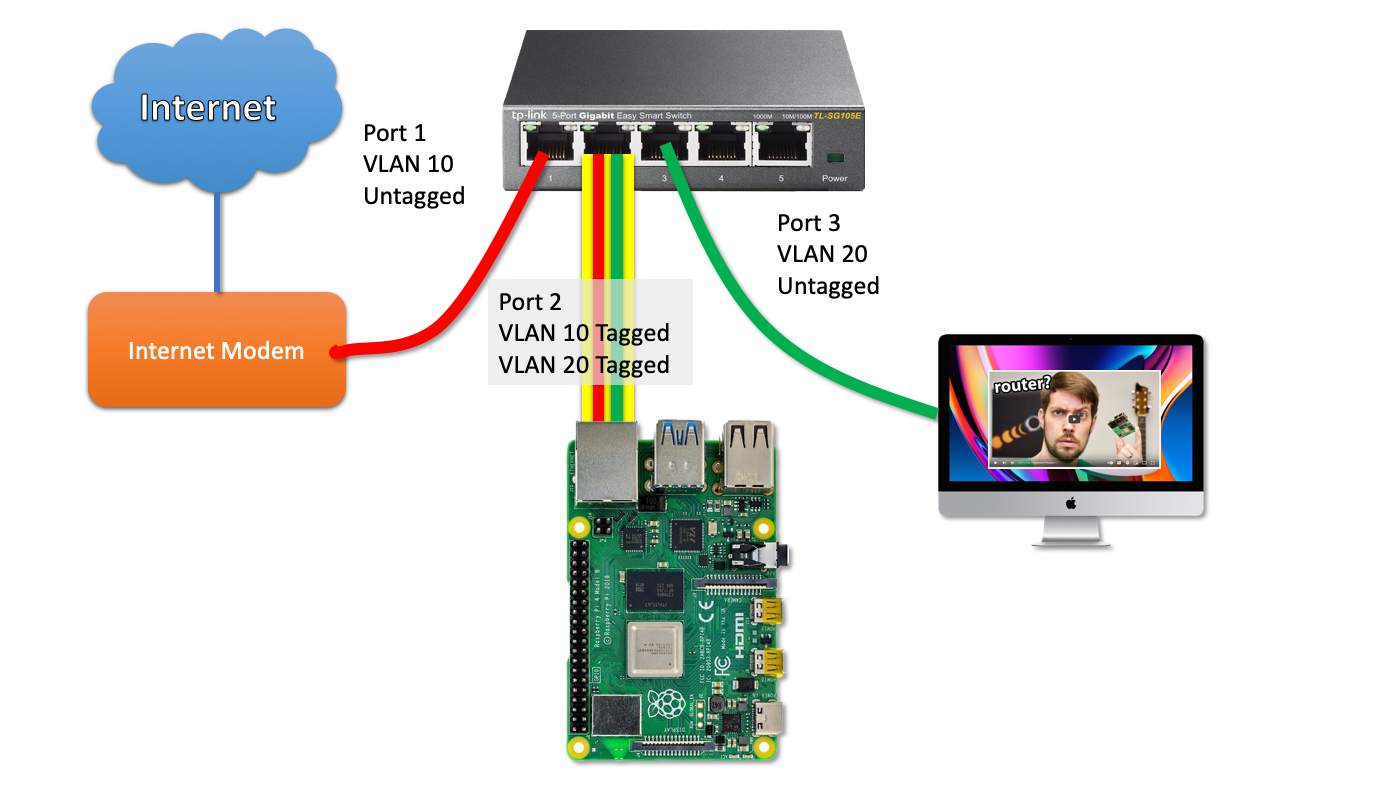
Configuring the Network
Proper network configuration is essential for your Raspberry Pi to function as a router. Here’s what you need to do:
- Edit the dhcpcd.conf file to configure static IP addresses: sudo nano /etc/dhcpcd.conf
- Set up your interfaces (eth0, wlan0) with the desired IP settings.
- Restart the networking service: sudo service dhcpcd restart
With the network configured, your Raspberry Pi is now ready to act as a router.
Installing and Configuring Pi-Hole
Pi-Hole is a fantastic tool that turns your Raspberry Pi into a network-wide ad blocker and DNS sinkhole. Here’s how you can install and configure it:
- Open the terminal and run the following command: curl -sSL https://install.pi-hole.net | bash
- Follow the on-screen instructions to complete the installation.
- Once installed, access the Pi-Hole admin panel by navigating to http://pi.hole/admin in your browser.
Pi-Hole not only blocks ads but also provides detailed analytics about your network traffic, making it an invaluable addition to your firewall router setup.
Tips for Optimizing Your Raspberry Pi Firewall Router
Now that your Raspberry Pi is set up as a firewall router, here are some tips to optimize its performance:
Regular Updates
Keeping your Raspberry Pi updated is crucial for maintaining security and performance. Use the following commands to update your system:
- sudo apt update
- sudo apt upgrade
Monitoring Network Traffic
Monitoring your network traffic can help you identify potential threats and optimize your setup. Tools like vnstat and nload can provide valuable insights into your network usage.
Common Issues and Troubleshooting
As with any tech project, you might encounter some issues while setting up your Raspberry Pi firewall router. Here are a few common problems and how to fix them:
Connection Problems
If you’re experiencing connection issues, double-check your network configuration and ensure that all cables are properly connected. Restarting the networking service can also help resolve connectivity problems.
Firewall Rules Not Working
Make sure your firewall rules are correctly set up and that the UFW service is running. You can check the status of UFW with the command: sudo ufw status
Future Enhancements for Your Raspberry Pi Firewall Router
Once you’ve successfully set up your Raspberry Pi as a firewall router, there are plenty of ways to enhance its capabilities:
Adding Intrusion Detection Systems (IDS)
Installing an IDS like Snort can help detect and respond to potential threats in real-time. This adds an extra layer of security to your network.
Implementing a Virtual Private Network (VPN)
Setting up a VPN on your Raspberry Pi can encrypt your internet traffic and protect your data from prying eyes. Tools like OpenVPN make it easy to implement a secure connection.
Conclusion
In conclusion, setting up a Raspberry Pi as a firewall router is a fantastic way to enhance your network security. By following the steps outlined in this guide, you can create a customized solution that meets your specific needs. Remember to regularly update your system, monitor network traffic, and consider adding additional security measures like IDS and VPN.
So, what are you waiting for? Grab your Raspberry Pi and start building your very own firewall router today. Don’t forget to share your experience in the comments below and check out our other articles for more tech tips and tricks.
Table of Contents
- Why Use Raspberry Pi as a Firewall Router?
- Understanding the Basics of Raspberry Pi
- Setting Up Your Raspberry Pi for Firewall Router
- Configuring Raspberry Pi for Network Security
- Installing and Configuring Pi-Hole
- Tips for Optimizing Your Raspberry Pi Firewall Router
- Common Issues and Troubleshooting
- Future Enhancements for Your Raspberry Pi Firewall Router
- Conclusion